Blog
Entalas and ClarityBoss, a tool for managers
A little over a year ago, I created Simple Bit Labs to do some work on my own. Since then, I’ve learned a ton, and have had the opportunity to find a co-founder for another venture.
Matt Miner and myself started Entalas to do many of the same things I was doing at Simple Bit Labs - look for problems that might not be venture scale and attempt to solve them. We also know we aren’t going to strike gold on the first opportunity. Our latest product is ClarityBoss - an attempt to create management software that guides you to doing the right things, whether you area first time or seasoned manager.
We landed on developing this product after talking with several engineering managers, team leaders, and folks relatively new to people management. Several conversations later, we realized there is often a cobbled together toolset used by good managers to do their job. Even worse, new managers are promoted into the position because they were a good individual contributor, and often left to fend for themselves at learning the tricks of the trade of being a good manager, or the hope that osmosis worked when they were on the other side of the table.
Feedback is something we heard over and over about, and is a huge focus of the tool. Giving both positive and critical feedback to your direct reports at regular intervals is extremely important, and most managers don’t have good tools that keep them honest with it. While you can track this type of stuff in a Google Doc, it is unlikely to remind you to keep up the proper cadence.
Hopefully more to come in the future, but at least right now, it’s free for anyone to sign up and try! We’d love feedback, positive or critical.
I'm Launching Simple Bit Labs
In the past few months, I’ve started my own company to give freelance software development a try again. Simple Bit Labs is a registered Illinois LLC, and I’m hoping to do things a little differently than I first did 13 years ago when freelancing.
My goal is to not just engage in consulting-style work (although I’m open to it!), but instead, develop some software products that people might find useful. While the marketing hype would have you believe every software thing needs to turn into a unicorn startup, I don’t believe this is the case. There are plenty of neglected problems out there that could use a little help.
As of a few weeks ago, I’ve launched the first Simple Bit Labs product: Mobility Bot. This Slack bot helps you stay ahead of commute and transit delays by monitoring service alerts for various transit agencies and notifying you based on your preferred schedule. Please go check it out!
Stay tuned for more announcements, and maybe I’ll resume blogging here a bit more for the first time in a decade!
OpenVPN and ATA over Ethernet (AoE) interaction
Starting about 3 months ago, I started seeing some odd looking messages in my logs basically once a minute from OpenVPN.
$ journalctl -b -n6 -u openvpn@server
-- Logs begin at Sat 2012-11-10 12:22:39 CST, end at Mon 2013-02-25 21:53:30 CST. --
Feb 25 21:41:15 toofishes openvpn@server[31141]: IP packet with unknown IP version=15 seen
Feb 25 21:42:15 toofishes openvpn@server[31141]: IP packet with unknown IP version=15 seen
Feb 25 21:43:15 toofishes openvpn@server[31141]: IP packet with unknown IP version=15 seen
Feb 25 21:44:15 toofishes openvpn@server[31141]: IP packet with unknown IP version=15 seen
Feb 25 21:45:15 toofishes openvpn@server[31141]: IP packet with unknown IP version=15 seen
Feb 25 21:46:16 toofishes openvpn@server[31141]: IP packet with unknown IP version=15 seen
Now that Munin supports zooming, I was able to pin this down to a pretty specific point in time when the odd behavior started. This is a graph of tun0 traffic. Luckily I don’t often send traffic to or from the VPN server itself; it is usually from client to client so I was able to see a difference of just a bits a minute in traffic.
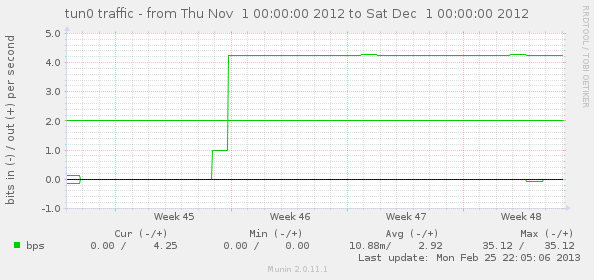
Searching the Internet didn’t yield much on this, unfortuately, so I punted on it for a while until it started bugging me tonight. What the heck was this? One related post started to dig into it, but “fixed” it by switching to a different non-Linode, Ubuntu-provided kernel. Although not a solution I was going to use, this realization was the key to understanding this whole situation and how to fix it.
- Linode’s kernel has a builtin AoE block device driver as of 3.5.3.
- AoE has an EtherType of
0x88A2, which was noticed after doing a tcpdump on both theeth0andlointerfaces and seeing the once-per-minute packet. - Ebtables doesn’t work to block this, which is what I tried first.
- By default, this sends out a “discover” query on all interfaces every 60 seconds, with no obvious way to disable this.
The solution I arrived at was to tell this silly built-in AoE driver to send discover packets to only the lo interface, where they will effectively be ignored. This skips both the public eth0 interface and the tun0 interface (which is used by OpenVPN).
echo 'lo' > /sys/module/aoe/parameters/aoe_iflist
This totally removed the bogus traffic from ever showing on tun0 and OpenVPN is no longer logging messages once per minute about a protocol it cannot understand.
Django syndication feed views and New Relic
Using New Relic together with Django? It is a fairly cool and noninvasive web performance monitoring situation that I’ve been testing out over the past month or so. One thing I figured out made it a lot easier to get unique web transaction name per syndication Feed subclass, which wasn’t happening out of the box. You’ll want to add a __name__ attribute to the class, giving you something like the following:
from django.contrib.syndication.views import Feed

class NewsFeed(Feed):
    __name__ = 'news_feed'
You can see an example of this in action for multiple feeds in the Archweb NewsFeed implementation. This made feeds show up as “/feeds:news_feed” and “/feeds:package_feed” rather than all showing up under one web transaction name.
Now I’m just wishing New Relic was less expensive (or free!) for open-source project websites…
IPv6 follow-up: OpenVPN transport over IPv6
Over 18 months ago I dual-stacked my Linode and made almost all services accessible via both IPv4 and IPv6. Although no where near as popular as IPv4, I do see hits on HTTP, HTTPS, NTP, and git ports on my machine over IPv6.
The one service I couldn’t set up over IPv6 was OpenVPN. This has finally changed with the release of 2.3.0. OpenVPN now supports IPv6 as both a transport and payload when using a tun style device. The only thing I was really looking for was the transport side, so I’ll detail the configuration of that here.
The easiest way to configure this server-side is to leave local and port as defaults. Setting local to the IPv6 wildcard address doesn’t work at all, as discovered by trial and error. The only thing necessary is to change your proto line to read proto udp6 (as opposed to just udp). On Linux, this will enable binding to both the IPv6 and IPv4 wildcard addresses.
;local 0.0.0.0
;port 1194
;proto udp
proto udp6
dev tun
Concise summary query for pg_stat_statements
PostgreSQL 9.2 made the pg_stat_statements module a heck of a lot more useful now that it does query normalization. See the documentation for how to set the module up, as it is totally worth it if you are trying to track down the slow database queries in your application.
This is my goto query for finding statements worth optimizing. In the months I’ve been giving this a go, I’ve been able to quickly pinpoint the queries causing the most delay in returning data without being overwhelmed by one-off reporting queries.
SELECT rolname,
	calls,
	round(total_time::numeric, 1) AS total,
	round((total_time / calls)::numeric, 3) AS per_call,
	rows,
	regexp_replace(query, '[ \t\n]+', ' ', 'g') AS query_text
FROM pg_stat_statements
JOIN pg_roles r ON r.oid = userid
WHERE calls > 100
AND rolname NOT LIKE '%backup'
ORDER BY total_time / calls DESC
LIMIT 15;
The beauty of this query:
- Query text is normalized by coalescing whitespace
- Total time and per-call time are immediately obvious
- Don’t show uncommon queries that may skew the results
- Shows how to exclude things from a backup-type user if you have one
So it doesn’t overwhelm the width of this blog, I’ve posted a small sample snippet below of what you can expect to see. This particular snippet comes from the Archweb production database.
 rolname | calls |  total  | per_call |  rows  |                                                         query_text
---------+-------+---------+----------+--------+-----------------------------------------------------------------------------------------------------------------------------
 archweb |   502 | 33855.9 |   67.442 |    502 | SELECT COUNT(*) FROM "packages" INNER JOIN "repos" ON ("packages"."repo_id" = "repos"."id") WHERE ("repos"."staging" =  ...
 archweb |   314 | 17271.0 |   55.003 |   5904 | SELECT "packages"."id", "packages"."repo_id", "packages"."arch_id", "packages"."pkgname", "packages"."pkgbase", "packag ...
 archweb |   298 |  5742.4 |   19.270 |    298 | SELECT COUNT(*) FROM "packages" INNER JOIN "repos" ON ("packages"."repo_id" = "repos"."id") WHERE "repos"."staging" = ? ...
 archweb |   114 |  2040.7 |   17.901 |     52 | SELECT "packages_update"."id", "packages_update"."package_id", "packages_update"."repo_id", "packages_update"."arch_id" ...
 archweb |   300 |  1882.5 |    6.275 |  27000 | SELECT "packages"."id", "packages"."repo_id", "packages"."arch_id", "packages"."pkgname", "packages"."pkgbase", "packag ...
 archweb |   287 |  1462.2 |    5.095 | 164563 | SELECT "package_files"."id", "package_files"."pkg_id", "package_files"."is_directory", "package_files"."directory", "pa ...
 archweb |   163 |   403.9 |    2.478 |   8150 | SELECT "packages"."id", "packages"."repo_id", "packages"."arch_id", "packages"."pkgname", "packages"."pkgbase", "packag ...
 archweb |   796 |  1442.5 |    1.812 |   9124 | SELECT "packages_depend"."id", "packages_depend"."name", "packages_depend"."version", "packages_depend"."pkg_id", "pack ...
 archweb |   380 |   488.8 |    1.286 |   1474 | SELECT DISTINCT "packages"."pkgname" FROM "packages" WHERE "packages"."pkgname"::text LIKE ? ORDER BY "packages"."pkgna ...
 archweb |  1026 |  1029.4 |    1.003 |  62586 | SELECT "auth_user"."id", "auth_user"."username", "auth_user"."first_name", "auth_user"."last_name", "auth_user"."email" ...
 archweb |   145 |   113.2 |    0.781 |    396 | SELECT "packages_depend"."id", "packages_depend"."name", "packages_depend"."version", "packages_depend"."pkg_id", "pack ...
 archweb |   110 |    84.4 |    0.767 |   5500 | SELECT DISTINCT "mirrors_mirrorurl"."country" FROM "mirrors_mirrorurl" INNER JOIN "mirrors_mirror" ON ("mirrors_mirroru ...
 archweb |   251 |   172.3 |    0.686 |    251 | SELECT "releng_release"."id", "releng_release"."release_date", "releng_release"."version", "releng_release"."kernel_ver ...
 archweb |   137 |    86.8 |    0.634 |    182 | SELECT DISTINCT "packages"."id", "packages"."repo_id", "packages"."arch_id", "packages"."pkgname", "packages"."pkgbase" ...
 archweb |   969 |   347.5 |    0.359 |    998 | SELECT "packages"."id", "packages"."repo_id", "packages"."arch_id", "packages"."pkgname", "packages"."pkgbase", "packag ...
My rule of thumb is somewhat as follows:
- Queries over 100 ms/call are worth checking the
EXPLAINandEXPLAIN ANALYZEresults for. Sometimes you’ll see it is doing a full sequential scan; indexes are your friend. Other times the fix is much more involved; see this optimization of required by lookup as an example that required adding a customUNION ALLclause to a Django queryset. - Queries under 100 ms/call sometimes have room for optimization, but the fix isn’t always obvious.
- Anything < 5 ms/call is usually not worth touching, unless you notice it seems to be called way too much (you’ll want to sort by
callsortotalinstead). In that case, optimize it in the application.
MySQL and /tmp on tmpfs
Short but sweet post here. The short version is this: if you are currently running MySQL and don’t have /tmp on a tmpfs, you’re getting burned and performance will be extremely poor. The graphs below pretty much speak for themselves. We went from far too many slow queries and very high I/O on the only two disks this machine has (the box hosting the Arch Linux AUR) to almost no slow queries at all, normal I/O, and reduced CPU and IO wait.
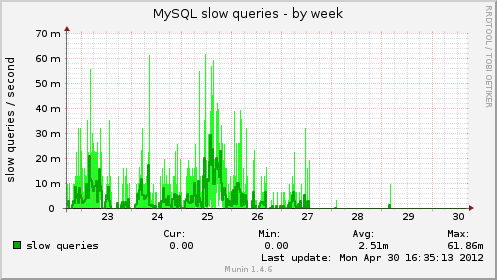
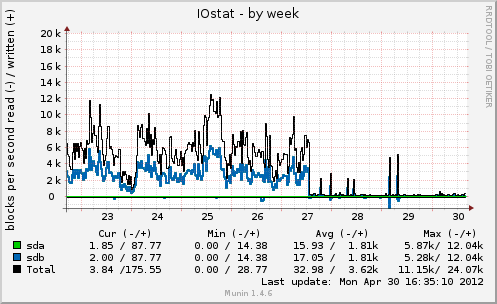
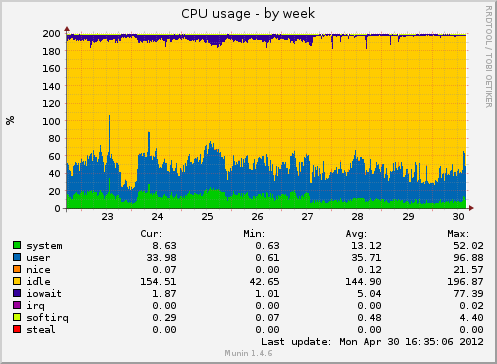
If it wasn’t clear, the reason this makes such a difference is MySQL’s usage of temp for sorting and temporary table purposes when things can’t fit in memory. Moving to a tmpfs means nothing ever needs to get flushed to disk or journaled, even if it is deleted within milliseconds of it being created.
Ten Years of Arch Linux
I’ll join the party, although I missed the actual date everyone keyed onto by a day. Thanks, Allan McRae, Andrea Scarpino, Daniel Isenmann, Dave Reisner, Ionuț Mircea Bîru, and Pierre Schmitz for already doing one of these. Also thanks to every current or former developer, TU, or active community member for all your work over the past ten years.
So here are the dates I can pull together:
- 2006-05-24: First entry in pacman.log on the first computer I installed it on.
- 2006-06-06: Registered on the Arch Linux forums.
- 2006-09-14: First package (if I remember correctly), weka, submitted to the AUR.
- 2006-11-15: First message to the pacman-dev mailing list.
- 2006-12-12: Aaron Griffin asks me if I would be interested in being a pacman developer.
- 2007-01-29: I officially become an Arch developer, focusing on pacman-related stuff.
- 2007-03-25: pacman 3.0.0 is released, the first version to have libalpm included, and the first version I both contributed to and helped drive the final release.
- 2008-06-04: Brought Allan McRae on as a developer for his work on pacman/makepkg as well as his attitude in the forums helping many a misguided user.
- 2008-11-23: My first patch to archweb.
- 2009 and 2010: “Stuff”, because I’m too lazy to look up any more events that happened.
- 2011-03-24: Wrote my most commented-on blog post to date, The real story behind Arch Linux package signing.
- 2011-06-13: Sponsored Dave Reisner (aka falconindy) to be a developer as he had contributed significantly to pacman and thought it would be great to get recognition for his work. In hindsight, perhaps this was a mistake. :)
- 2011-10-13: Pacman 4.0.0 with package signing “finally” released.
python-pgpdump, a PGP packet parser library
PGP file formats and data are not the simplest thing to wrap your head around, so pgpdump is a very handy tool to have available. Although similar to gpg --list-packets, pgpdump output is a bit more verbose and descriptive.
pgpdump is a PGP packet visualizer which displays the packet format of OpenPGP (RFC 4880) and PGP version 2 (RFC 1991).
There is an online version available as well if you have never used it before and want to see what it is. Here is the output when parsing a detached signature file.
$ pgpdump testfile.sig
Old: Signature Packet(tag 2)(70 bytes)
	Ver 4 - new
	Sig type - Signature of a binary document(0x00).
	Pub alg - DSA Digital Signature Algorithm(pub 17)
	Hash alg - SHA1(hash 2)
	Hashed Sub: signature creation time(sub 2)(4 bytes)
		Time - Wed Mar  7 15:42:52 CST 2012
	Sub: issuer key ID(sub 16)(8 bytes)
		Key ID - 0x5C2E46A0F53A76ED
	Hash left 2 bytes - d4 1a
	DSA r(159 bits) - ...
	DSA s(160 bits) - ...
		-> hash(DSA q bits)
With package signing now a reality in Arch Linux, I wanted a way of displaying the signature data stored in the package databases on the website. I was a bit disappointed after searching for tools that could be used to help me do this, and shelling out to gpg or another tool seemed like a bad way of going about it.
It turns out the PGP packet format is completely insane, which is probably why there isn’t much in the way of library support nor many binary implementations outside of GnuPG. Luckily the pgpdump code is a lot more terse than diving into GnuPG, so I was able to use it as a good reference point for writing a PGP packet-parsing library in Python.
The two existing projects I found related to PGP in Python appear to be abandoned: OpenPGP, last updated in July 2005, and pgpmsg, which has no listed date, and no source files.
Discovering there was nothing great out there, I present my first package on PyPi, python-pgpdump. The home for the code is on github. Designed so it can hopefully parse every type of PGP packet down the road, the first release did only what I needed it to do- parse detached signature packet data. I’ve already had one contributor add public key packet parsing support, so that is a good sign that I didn’t code things too stupidly. Since then, I have also added some parsers for other packets and public key algorithms.
The end result of this is a usable library to extract the details from the PGP signature data with no dependencies except the Python standard library. This allows us to show the PGP key ID of the person who created the signature on the Arch Linux website, and from there, match the key ID to a developer’s known key in the system.
In [1]: import base64, pgpdump

In [2]: data = base64.b64decode("iEYEABECAAYFAk824S0ACgkQXC5GoPU6du3rsgCeOXqjR0K
NIIfdZNhLZtzvU5d7oc0AoJHaJRAgGv4r6kAKgsNjfMBttHwM")

In [3]: pgp_data = pgpdump.BinaryData(data)

In [4]: pgp_data.data
Out[4]: bytearray(b'\x88F\x04\x00\x11\x02\x00\x06\x05\x02O6\xe1-\x00\n\t\x10\\.F
\xa0\xf5:v\xed\xeb\xb2\x00\x9e9z\xa3GB\x8d \x87\xddd\xd8Kf\xdc\xefS\x97{\xa1\xcd
\x00\xa0\x91\xda%\x10 \x1a\xfe+\xea@\n\x82\xc3c|\xc0m\xb4|\x0c')

In [5]: packets = list(pgp_data.packets())

In [6]: packets[0]
Out[6]: <SignaturePacket: DSA Digital Signature Algorithm, SHA1, length 70>

In [7]: packets[0].key_id
Out[7]: '5C2E46A0F53A76ED'

In [8]: packets[0].datetime
Out[8]: datetime.datetime(2012, 2, 11, 21, 44, 13)
I definitely welcome pull requests for any improvements. I would highly recommend looking at the pgpdump C source if you need to figure out what is going on in addition to reading RFC 4880.
MySQL deadlocking on simple inserts
Poor MySQL, always getting picked on. However, it is pretty bad that a relational database in the year 2012 cannot handle simultaneous non-conflicting inserts on a table when transactions are involved.
First, some background. The InnoDB documentation does have a section dealing with deadlocks and possible ways to avoid them. There, it offers this wonderful fact:
You can get deadlocks even in the case of transactions that just insert or delete a single row.
A relatively recent update to archweb, the Arch Linux website code, added an inotify-based update script that watches the package repository database files for updates, and then kicks off the script for updating the website database.
Previously this ran on a fixed schedule via cron, so updates to the database were serialized, and things worked as expected. However, it now often occurs that the databases for the same repository for both architectures are updated at nearly the same time (within seconds of each other). The inotify-based script will thus kick off two simultaneous updates; however, these updates should always be non-conflicting and operating on different rows in the various touched tables.
After a few trials, I started noticing updates not running to completion, and tracebacks such as the following (slightly trimmed for brevity).
$ ./manage.py reporead_inotify -v0
Process Process-17:
Traceback (most recent call last):
  File "/usr/lib/python2.7/multiprocessing/process.py", line 258, in _bootstrap
    self.run()
  File "/usr/lib/python2.7/multiprocessing/process.py", line 114, in run
    self._target(*self._args, **self._kwargs)
...
  File "/srv/http/archweb/devel/management/commands/reporead.py", line 223, in populate_pkg
    populate_files(dbpkg, repopkg, force=force)
  File "/srv/http/archweb/devel/management/commands/reporead.py", line 283, in populate_files
    pkgfile.save(force_insert=True)
  ...
  File "/usr/lib/python2.7/site-packages/MySQLdb/cursors.py", line 174, in execute
    self.errorhandler(self, exc, value)
  File "/usr/lib/python2.7/site-packages/MySQLdb/connections.py", line 36, in defaulterrorhandler
    raise errorclass, errorvalue
OperationalError: (1213, 'Deadlock found when trying to get lock; try restarting transaction')
The first step to debugging deadlocks is to ask the database what the heck happened. Here is the output from SHOW ENGINE INNODB STATUS;.
------------------------
LATEST DETECTED DEADLOCK
------------------------
120130 14:53:49
*** (1) TRANSACTION:
TRANSACTION 32116C73, ACTIVE 1 sec inserting
mysql tables in use 1, locked 1
LOCK WAIT 12 lock struct(s), heap size 3112, 8 row lock(s), undo log entries 4
MySQL thread id 393561, OS thread handle 0x7f61cc503700, query id 5884410 localhost 127.0.0.1 archweb-update update
INSERT INTO `package_files` (`pkg_id`, `is_directory`, `directory`, `filename`) VALUES (70297, 1, 'usr/share/', NULL)
*** (1) WAITING FOR THIS LOCK TO BE GRANTED:
RECORD LOCKS space id 0 page no 139734 n bits 224 index `package_files_pkg_id` of table `archweb`.`package_files` trx id 32116C73 lock_mode X insert intention waiting
Record lock, heap no 1 PHYSICAL RECORD: n_fields 1; compact format; info bits 0
 0: len 8; hex 73757072656d756d; asc supremum;;

*** (2) TRANSACTION:
TRANSACTION 32116C74, ACTIVE 1 sec inserting
mysql tables in use 1, locked 1
11 lock struct(s), heap size 1248, 6 row lock(s), undo log entries 2
MySQL thread id 393562, OS thread handle 0x7f61d18ce700, query id 5884411 localhost 127.0.0.1 archweb-update update
INSERT INTO `package_files` (`pkg_id`, `is_directory`, `directory`, `filename`) VALUES (70298, 1, 'usr/', NULL)
*** (2) HOLDS THE LOCK(S):
RECORD LOCKS space id 0 page no 139734 n bits 224 index `package_files_pkg_id` of table `archweb`.`package_files` trx id 32116C74 lock_mode X
Record lock, heap no 1 PHYSICAL RECORD: n_fields 1; compact format; info bits 0
 0: len 8; hex 73757072656d756d; asc supremum;;

*** (2) WAITING FOR THIS LOCK TO BE GRANTED:
RECORD LOCKS space id 0 page no 139734 n bits 224 index `package_files_pkg_id` of table `archweb`.`package_files` trx id 32116C74 lock_mode X insert intention waiting
Record lock, heap no 1 PHYSICAL RECORD: n_fields 1; compact format; info bits 0
 0: len 8; hex 73757072656d756d; asc supremum;;

*** WE ROLL BACK TRANSACTION (2)
Trying to debug this, I came across a great blog post that describes InnoDB deadlocking on concurrent inserts. More specifically, this is due to “gap locking”.
What is unfortunate is the post describes this only happening when a UNIQUE index is involved. In the case detailed above, the package_files_pkg_id index is most-definitely not unique, and you can see the values going into that column (70297 and 70298) are different.
At this point, I’ve been hesitant to “solve” this problem by hacks in the code, as it seems like a total failure at the database level more than anything else. This seems like as good of an excuse as any to get the site switched to using PostgreSQL now that the hosting server isn’t responsible for four MySQL databases anymore.
Want to see more posts? Take a look at the archives or take a look at the tag list.